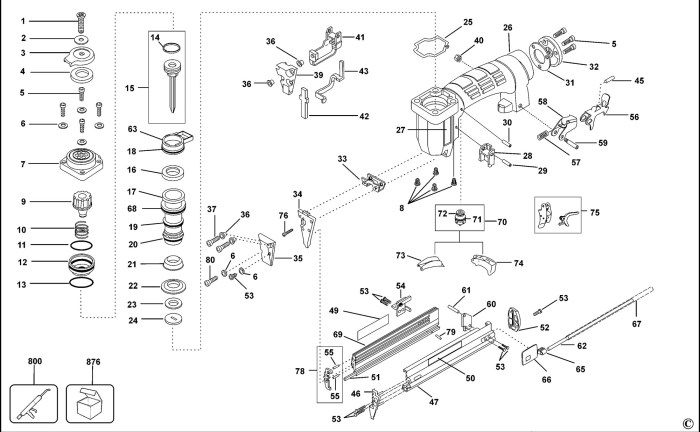
Bostitch nail gun parts diagram provides a crucial visual reference for understanding the intricate workings of these essential tools. This guide offers a detailed exploration of the components, highlighting their individual functions and roles within the overall operation of various Bostitch nail gun models. Understanding these parts is key to proper maintenance, troubleshooting, and efficient operation.
This comprehensive resource offers detailed diagrams and descriptions, making it easy to identify each part and its location on the nail gun. The information is presented in a clear and organized manner, ensuring a straightforward comprehension of the topic. The inclusion of safety precautions further enhances the guide’s practical application.
Introduction to Bostitch Nail Gun Parts
Bostitch nail guns are essential tools in various construction, woodworking, and furniture-making applications. They are renowned for their efficiency and power in fastening tasks. Understanding the different types of Bostitch nail guns, such as pneumatic and cordless models, is crucial for selecting the appropriate tool for the specific job. These guns come in various sizes and capacities, each tailored to different nail sizes and fastening needs.
From simple repairs to large-scale projects, Bostitch nail guns are versatile and widely used.Understanding the intricacies of Bostitch nail gun parts is vital for efficient operation and prolonged tool lifespan. A clear comprehension of each component, from the trigger mechanism to the nail magazine, empowers users to effectively troubleshoot issues, maintain the tool properly, and ensure optimal performance.
This detailed knowledge prevents costly repairs and maximizes the return on investment for the tool.
Common Bostitch Nail Gun Types
Bostitch offers a range of nail gun types, each designed for specific tasks. Pneumatic nail guns, powered by compressed air, are often preferred for their speed and efficiency in heavy-duty applications. Cordless models, fueled by rechargeable batteries, provide maneuverability and flexibility in tight spaces or areas with limited access to air compressors. The selection of the appropriate type depends heavily on the project’s requirements, including the volume of work, the accessibility of the workspace, and the desired level of mobility.
Importance of Proper Nail Gun Maintenance
Regular maintenance is paramount for ensuring the longevity and optimal performance of your Bostitch nail gun. Routine cleaning, lubrication, and inspection of critical components, like the piston, trigger, and magazine, are vital. This proactive approach prevents premature wear and tear, minimizes the likelihood of malfunctions, and extends the tool’s operational life. Proper maintenance saves money on costly repairs and ensures smooth and efficient operation.
Benefits of Detailed Diagrams
Detailed diagrams of Bostitch nail gun parts offer a visual guide to the intricate workings of the tool. They provide a clear understanding of each component’s function and its relationship to other parts. This detailed information assists in quick troubleshooting, enabling users to identify the source of a malfunction quickly and efficiently. Accurate diagrams provide a clear understanding of the correct assembly sequence and potential issues, such as incorrect alignment or damaged components.
The diagrams are invaluable resources for both novice and experienced users.
Troubleshooting Common Nail Gun Issues
Understanding the function of each part of a nail gun helps in diagnosing issues. A jammed nail often points to a clogged magazine or an issue with the mechanism that pushes the nail forward. A lack of power suggests a problem with the air compressor (in pneumatic models) or the battery (in cordless models). A diagram, coupled with clear instructions, is a helpful tool in addressing these problems, saving time and effort in rectifying the issues.
With the help of diagrams, even minor problems can be fixed quickly and effectively.
Identifying Common Bostitch Nail Gun Parts
Salam kenal, fellow DIY enthusiasts! Understanding the components of your Bostitch nail gun is key to maintaining its efficiency and longevity. Knowing how each part works together helps you troubleshoot issues and perform preventative maintenance, like a seasoned craftsman. Let’s delve into the intricate world of these powerful tools.Identifying the parts of your Bostitch nail gun is like deciphering a secret code.
Cariin diagram bostitch nail gun parts? Aduh, bisa-bisa kepala lo pusing kayak nyariin baju putih House of CB yang pas di badan, kayak house of cb white corset top. Tapi tenang, diagram bostitch nail gun parts ini mah gampang kok, kayak nyariin sepatu yang pas buat jalan-jalan di pasar. Yang penting teliti, biar nggak salah pasang bagian-bagiannya.
Each component plays a crucial role in the nail gun’s function, from the seemingly simple trigger to the intricate mechanism that drives the nail. By familiarizing yourself with these parts, you’ll be better equipped to handle repairs and maintain peak performance.
Magazine
The magazine is the receptacle for the fasteners, holding a supply of nails ready for use. It’s a crucial component, ensuring a consistent and uninterrupted workflow. A properly functioning magazine is essential for maintaining the nail gun’s efficiency. The design of the magazine varies depending on the specific model of Bostitch nail gun.
Driver
The driver is the heart of the nail gun, responsible for propelling the fastener (the nail) into the material. This component is essential for the nail gun’s operation. Understanding its function is key to ensuring proper use and maintenance. The driver’s mechanism can vary slightly across different Bostitch models.
Trigger
The trigger initiates the firing sequence, releasing the stored energy to propel the nail. It’s the crucial link between the user and the machine, allowing for precise and controlled deployment of the fastener. The trigger mechanism is vital to the nail gun’s safe and effective operation.
Fasteners (Nails)
The fasteners are the essential projectiles of the nail gun, providing the mechanical connection between materials. Proper fastener selection is crucial for achieving the desired results. Different nail types are suitable for different applications and materials.
Table of Bostitch Nail Gun Parts
| Part | Description | Location on Diagram (Conceptual) |
|---|---|---|
| Magazine | Holds the nails for firing. | Typically located at the rear or top of the nail gun. |
| Driver | The mechanism that propels the nail. | Usually located in the center, between the magazine and the trigger assembly. |
| Trigger | Initiates the firing sequence. | Located on the handle, usually near the user’s finger. |
| Fasteners (Nails) | The nails used to fasten materials. | Stored in the magazine. |
Diagrams and Visual Representations: Bostitch Nail Gun Parts Diagram

Salam, and welcome to this segment on Bostitch nail gun parts! Understanding the inner workings of your Bostitch nail gun is key to maintaining its efficiency and longevity. Visual representations, such as diagrams, play a crucial role in this process. They provide a clear picture of the components and their placement within the machine.
Bostitch Nail Gun Parts Diagram
A well-organized diagram is essential for identifying and understanding the components of your Bostitch nail gun. The following table provides a structured format for visualizing the parts:
| Part Name | Description | Location | Image (Placeholder) |
|---|---|---|---|
| Nail Magazine | Holds the nails ready for use. | Typically located at the front or top of the gun. | (Image of a nail magazine) |
| Trigger | Activates the firing mechanism. | Usually located on the top or side of the gun. | (Image of the trigger) |
| Nail Cartridge | Houses the nail magazine and allows for easy replacement. | The main body of the nail gun often houses this. | (Image of the cartridge) |
| Firing Mechanism | The system responsible for propelling the nail. | Inside the gun’s body, often concealed by other parts. | (Image of the firing mechanism) |
| Power Source (if applicable) | Electric motor or air compressor for power. | Depending on the type, located at the base, handle, or rear. | (Image of the power source) |
| Handle | Provides grip and control during operation. | Usually located on the side or top of the gun. | (Image of the handle) |
| Safety Mechanism | Prevents accidental firing. | Often located near the trigger or on the side. | (Image of the safety mechanism) |
Interpreting Bostitch Nail Gun Parts Diagrams
To effectively interpret a Bostitch nail gun parts diagram, pay close attention to the following aspects:
- Part Labels: Each component is clearly labeled with its name, facilitating quick identification.
- Part Numbers: Some diagrams use numbers to represent specific parts, which is helpful in referring to manuals or replacement parts.
- Relative Placement: The diagram depicts the parts’ position within the gun’s structure. Understanding this relationship is vital to assembly and maintenance.
- Key Symbols: Special symbols or markings may indicate critical components or functions, such as safety features.
- Cross-Reference: Always cross-reference the diagram with your specific nail gun’s manual for accurate interpretation and details on specific models.
Identifying Parts by Function and Visual Characteristics
Visual characteristics combined with understanding function are powerful tools for identifying parts. Consider these methods:
- Visual Inspection: Carefully examine the nail gun’s physical features to see the location of different parts.
- Functional Analysis: Understanding the purpose of each component helps in identifying its position in the diagram.
- Manual Consultation: Consult your Bostitch nail gun manual for a complete list of parts and their associated descriptions.
Examples of Labeled Diagrams
To illustrate the concept, imagine diagrams for different Bostitch nail gun types. A pneumatic nail gun diagram would show the air compressor inlet, the air hose connections, and the firing mechanism’s relation to the air pressure. An electric nail gun diagram would highlight the power cord and motor. A diagram for a stapler would feature the staples magazine and the mechanism for placing and securing staples.
These examples showcase how the diagram visualizes parts’ relationships and functionality.
Enhancing Understanding
Visual representations significantly improve understanding of Bostitch nail gun parts. They eliminate ambiguity and confusion by presenting a clear and concise image of each component’s location and function within the overall system. This, in turn, makes maintenance, repair, and troubleshooting much easier.
Troubleshooting and Maintenance
Maintaining your Bostitch nail gun ensures its longevity and optimal performance. Proper troubleshooting and maintenance are key to avoiding costly repairs down the line. Understanding common problems and their solutions is crucial for any user, and we’ll now delve into these important aspects.
Common Problems with Bostitch Nail Guns
Bostitch nail guns, like any power tool, can experience various issues. Understanding the potential problems allows for quicker and more effective solutions. Some common problems include:
- Jamming: A jammed nail gun can be frustrating and impede workflow. This often arises from improper nail insertion, using incorrect nail sizes, or the presence of debris within the mechanism.
- Reduced Driving Power: If your nail gun isn’t driving nails as effectively as it once did, several factors might be at play. This could stem from clogged channels, worn-out components, or a need for lubrication.
- Poor Trigger Response: A sluggish or unresponsive trigger can significantly impact efficiency. This is often linked to worn-out internal components or an issue with the trigger mechanism itself.
- Overheating: Prolonged use without proper ventilation can lead to overheating, potentially causing damage to internal components. This problem is usually related to inadequate airflow and heat dissipation.
Using Diagrams to Identify Problem Sources
Diagrams are invaluable tools for troubleshooting. Visual representations of the nail gun’s internal mechanisms allow users to pinpoint the source of the problem with ease. For example, a diagram showing the nail path clearly indicates whether a jammed nail is obstructing the mechanism. By correlating the diagram with the observed symptoms, you can effectively pinpoint the exact part requiring attention.
Repairing or Replacing Specific Parts
Addressing problems often involves replacing or repairing specific components. This process is greatly facilitated by clear diagrams and detailed instructions provided in the user manual. For instance, replacing a worn-out spring is often straightforward if the diagram clearly identifies its location and the replacement procedure. Always follow the manufacturer’s instructions carefully for safe and effective repairs.
Steps for Repairing/Replacing Parts
- Safety First: Disconnect the nail gun from the power source and ensure it’s completely cooled down before working on it. This prevents accidental starts and electrical hazards.
- Identify the Problem: Carefully examine the nail gun and refer to the accompanying diagrams to pinpoint the faulty component.
- Gather Necessary Tools and Parts: Make sure you have all the necessary tools, replacement parts, and safety equipment needed for the repair.
- Follow the Instructions: Refer to the manufacturer’s instructions or a reliable online resource for step-by-step guidance on disassembling, repairing, or replacing the faulty part.
- Reassemble Carefully: Carefully reassemble the nail gun, ensuring all parts are properly aligned and secured. Check that all connections are tight.
Comparison of Bostitch Nail Gun Models and Parts
Different Bostitch nail gun models might have varying internal components. This table provides a basic comparison of parts across different models.
| Model | Trigger Mechanism | Nail Path | Spring Mechanism | Driving Mechanism |
|---|---|---|---|---|
| Model A | Standard Trigger | Straight Path | Coil Spring | Pin Driven |
| Model B | Enhanced Trigger | Curved Path | Helical Spring | Pneumatic Driven |
| Model C | Electronic Trigger | Straight Path | Coil Spring | Motor Driven |
Parts Replacement and Ordering
Maintaining your Bostitch nail gun in tip-top shape is key to smooth, efficient work. Replacing worn-out parts is a straightforward process, allowing you to keep your tool performing optimally. Understanding how to identify and order replacement parts is crucial for a smooth operation. Let’s dive into the process!Replacing parts in a Bostitch nail gun is usually straightforward.
The key is careful identification of the needed part and adhering to the manufacturer’s instructions. This helps ensure proper function and safety.
Nah, ngomongin bostitch nail gun parts diagram tuh penting banget, biar ga salah pas pasang komponennya. Kalo mau cari apartemen bagus di SLC, coba cek nih West Station Apartments SLC UT , pasti dapet yang pas buat kebutuhanmu. Tapi tetep, penting banget buat paham diagram bostitch nail gun parts, jangan sampe salah pasang, nanti malah rusak alatnya, kan sayang.
Identifying Correct Replacement Parts
Using the provided diagrams is essential for accurately identifying the part you need. Each diagram features clear representations of the nail gun’s internal components, making it easy to pinpoint the problematic area. Referencing these detailed visuals is a critical step in the replacement process.
Using Diagrams for Part Identification
The diagrams act as a visual guide to help you pinpoint the precise part that needs replacement. Look closely at the diagram for a corresponding part number. This ensures that you select the correct component.
Ordering Replacement Parts
Ordering replacement parts from a reputable source is important. Carefully record the part number from the diagram, and cross-reference it with the Bostitch website or a trusted supplier. This will ensure you receive the correct part. Be sure to note the specific nail gun model when ordering.
Identifying Compatible Replacement Parts
Different Bostitch nail gun models might share some components, but it’s crucial to confirm compatibility. Always check the model number of your nail gun and the replacement part to ensure compatibility. Consult the manufacturer’s documentation or website for a list of compatible parts for your specific model. If in doubt, contact Bostitch customer support for assistance.
Safety Precautions
Maintaining safety is paramount when working with Bostitch nail guns and their parts. Proper handling and maintenance minimize the risk of injury, ensuring a smooth and productive workflow. Understanding the potential hazards and implementing preventative measures is crucial for both personal well-being and job site efficiency. Let’s delve into the essential safety precautions.
Critical Safety Considerations
Working with power tools demands meticulous attention to detail and safety. Improper use or maintenance of a Bostitch nail gun, or its components, can lead to serious injuries. These injuries can range from minor cuts and bruises to more severe accidents like eye injuries or fractures. A strong safety culture prioritizes the well-being of all involved.
Risks of Improper Use and Maintenance
Improper use of a Bostitch nail gun can lead to misfires, jams, and uncontrolled ejection of nails, posing a significant risk to the operator and bystanders. Neglecting routine maintenance, such as cleaning and inspecting the parts, can lead to reduced performance, causing unexpected malfunctions. Failure to observe safety guidelines can result in accidents with serious consequences.
Safe Handling Procedure, Bostitch nail gun parts diagram
To ensure the safe handling of Bostitch nail gun parts, follow these steps:
- Always wear appropriate safety gear. This includes safety glasses, gloves, and ear protection. These are critical for safeguarding against potential hazards during operation and maintenance. Always prioritize your safety and well-being.
- Inspect the nail gun before each use. Check for any damage to the housing, trigger, or other parts. Look for loose connections, worn components, or any sign of malfunction. A quick visual check can prevent serious issues later on.
- Use the correct type and size of nails. Using inappropriate nails can lead to malfunctions and increase the risk of injury. Ensure that the nails are compatible with the gun’s specifications. Mismatched nails can cause accidents.
- Maintain a safe working environment. Clear the work area of obstructions and ensure adequate lighting. A well-organized workspace reduces the risk of accidents.
- Never point the nail gun at yourself or others. Always ensure that the nail gun is pointed away from any person when activating the trigger. This simple precaution prevents accidental injuries.
- Store the nail gun and parts securely. Keep the nail gun and its components in a designated storage area, out of reach of children and unauthorized personnel. Proper storage prevents accidental misuse and damage.
- Disconnect the power source before servicing. Disconnecting the power supply prevents accidental activation during maintenance procedures. This crucial step minimizes the risk of injury.
Safety Tips
Following these safety tips is crucial for accident prevention:
- Read the instruction manual thoroughly before using the nail gun. This crucial step helps you understand the proper procedures and safety precautions. A clear understanding of the operation minimizes potential hazards.
- Use the appropriate accessories for the task. Using the right accessories for the job will reduce the likelihood of malfunctions. Proper tool selection is critical for safety.
- Never attempt to repair or modify the nail gun yourself unless you are a qualified technician. Modifying the tool may void warranties and increase the risk of injury. Seek professional help when necessary.
- Report any damage or malfunction to a qualified technician immediately. Addressing issues promptly minimizes the risk of accidents and ensures proper maintenance. Preventative maintenance is crucial.
- Be aware of your surroundings and potential hazards. This precaution is essential for minimizing the risk of accidents in any work environment. Being mindful of your surroundings is critical.
Different Bostitch Nail Gun Models
Salam kenal, and welcome to this exploration of the diverse world of Bostitch nail gun models. Understanding the variations between these models is crucial for proper use, maintenance, and troubleshooting. Each model is engineered with specific features and functionalities, making it important to understand the distinctions.
Model Comparison
Different Bostitch nail gun models cater to various needs and applications. This section will highlight key differences across models, helping you choose the right tool for your job. By understanding the unique characteristics of each model, you can maximize efficiency and avoid potential issues.
Model-Specific Parts and Diagrams
To gain a clearer picture of the variations, we present a structured table outlining the different models, their unique parts, and accompanying diagrams. This table will assist you in identifying the specific components within each model and understanding their functionality.
| Model Number | Primary Application | Unique Parts | Diagram Description |
|---|---|---|---|
| BT750 | General-purpose fastening for wood and light-duty metal | Compact design, trigger mechanism, simplified jam release, robust build | The BT750 diagram displays a compact design with a clear trigger mechanism. The jam release is straightforward to access, allowing for quick and easy clearing of blockages. The overall construction is reinforced to withstand moderate use. |
| BT900 | Heavy-duty fastening for wood and metal | Reinforced chassis, larger magazine capacity, advanced trigger mechanism, enhanced jam release system | The BT900 diagram demonstrates a more substantial chassis compared to the BT750. The larger magazine capacity is evident, alongside a more sophisticated trigger mechanism and improved jam release system. |
| BT500 | Precise fastening for trim work and furniture assembly | Ergonomic grip, precise nail placement mechanism, smaller magazine capacity, lightweight build | The BT500 diagram features an ergonomic grip for enhanced user comfort. The nail placement mechanism is more refined for finer work. The smaller magazine capacity and lightweight build contribute to maneuverability. |
Key Differences in Component Design
The key differences in component design across various Bostitch nail gun models primarily revolve around factors such as the intended application, the material being fastened, and the desired level of precision and power. A heavier-duty model will have different parts, such as a reinforced chassis and larger magazine capacity, than a model designed for delicate work.
Closing Summary
In summary, this comprehensive guide to Bostitch nail gun parts diagrams provides a valuable resource for users seeking to maximize their tools’ efficiency and longevity. The detailed information on parts identification, troubleshooting, and maintenance ensures users can confidently handle their Bostitch nail guns. Ultimately, this guide empowers users to effectively utilize and maintain their Bostitch nail guns, minimizing potential issues and maximizing their operational life.
FAQ Insights
What are the common problems with Bostitch nail guns?
Common issues include jammed magazines, faulty triggers, and broken drivers. Troubleshooting often involves checking for obstructions, examining the trigger mechanism, and ensuring the driver is correctly positioned.
How can I identify compatible replacement parts for different Bostitch nail gun models?
Refer to the diagrams and tables provided to match the part number and description to the correct replacement. Model-specific differences are clearly highlighted, allowing users to identify suitable replacements.
What are the safety precautions when working with Bostitch nail guns and their parts?
Always disconnect the power source before any maintenance. Wear appropriate safety gear, including eye protection and gloves. Avoid contact with moving parts. Refer to the included safety guidelines for specific procedures.
How do I interpret a Bostitch nail gun parts diagram?
The diagram uses clear labeling and numbering to correspond to specific components. Use the descriptions to understand the function of each part and its position on the nail gun. Refer to the accompanying table for further clarity.
